
The recommendation came without warning. While discussing this project with my brother, out of the blue he tells me to "Replace the fuel pump". Why? I thought. It worked fine when I garaged the car seven years ago. And the thought of purchasing another expensive part(s) when I am on the verge of restarting the motor was unthinkable. Another major repair job just when I thought I was nearing completion. I've never worked on the fuel tank of the Corrado and my recollections of replacing the fuel tank from my older Golf GL were not pleasant.
But as fate would have it, when I attempted to start the car after seven years, I had no success. After checking for spark, I did the usual troubleshooting and discovered the fuel pump was indeed inoperable. Furthermore, after disassembling the fuel rail near the injectors, there was no fuel present. My brother's recommendation was accurate. After 21 years it should be replaced.
There were two fuel pump designs for the 1990-92 VW Corrado. The first design utilized two electric pumps similar to the MKII VW Golf/Jetta. Midway through the 1990 model year, Volkswagen redesigned the fueling system into a more reliable single pump which is submerged inside the fuel tank. The secondary pump and external pressurized fuel reservoir of the previous design were discarded for the simpler single pump design.
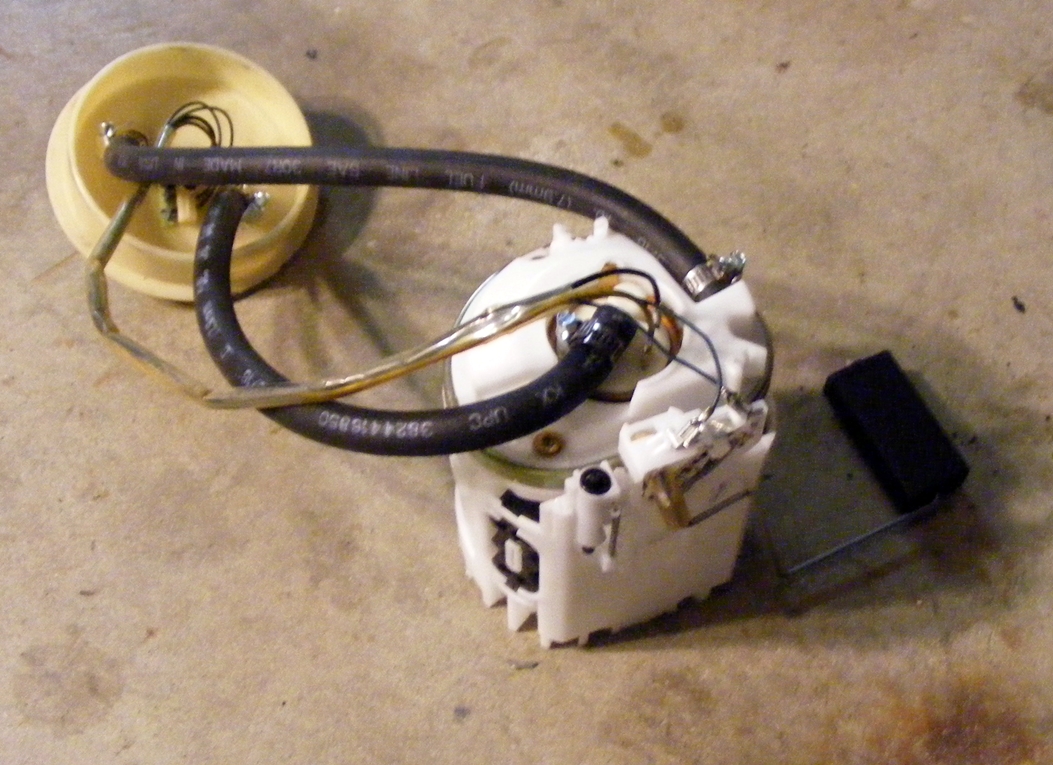
The single pump design utilized an electric pump known as the "Pierberg". The Fuel level sender and float were incorporated into the pump body which was mounted to the floor of the fuel tank using a twist style bayonet mount. It was accessed through a cover that is located near the spare tire in the back of the car.
First order of business when performing maintenance on this system is cleanliness. Any contamination entering the fuel system will only cause more issues further up stream.
Note: Before doing this procedure, practice clean working habits, limit exposure of your skin to fuel, and disconnect the battery. Perform this work in a well ventilated area and keep a fire extinguisher nearby.
The Bentley manual outlines all the steps and familiarized me with the parts and the order of assembly. Full diagrams and troubleshooting procedures are outlined in section 20. Following the removal instructions, I was able to extract the old Pierberg pump from the fuel tank. It was not easy as I did not possess the special tool required to twist off the threaded retaining ring. I used a flathead screwdriver and a hammer and gently tapped the ring until it twisted off. Once off, I was able to lift the flange, disconnect the wires, and pull view inside the tank. I was aghast with what I discovered. After some 20 years submerged in fuel, the old pump had deteriorated into a collection of broken parts that rattled around inside the main body of the pump. There was debris and mineral deposits that filled all of the holes. The supply and return fuel lines were dissolved into a slimy gooey mess!

The Bentley instructs to twist it to the left and then extract the pump. But once I got it out, I did not find the float or the fuel sender. I then realized it had dissolved and was probably sitting at the bottom of the tank. The task was now to collect the loose debris from the tank which still had fuel in it from my first attempt at starting the car. This is some of the debris I collected from inside the tank. Below left is the disintegrated fuel sender and the new VDO replacement unit on the right.

After performing some research, I discovered that the old Peirberg pump had since been replaced by a VDO unit. The newer unit supposedly eliminates some of the issues that were exhibited by the older Peirbergs. In addition, the new VDO required a differently designed fuel level sender. Other required parts would include the O-Ring for the pump, approximately 50cm of 7.4mm fuel line, 1/4" hose clamps, and new electrical spades for the wiring. Below is a comparative picture of the two pumps side by side. The Peirberg is a total mess!

For reference, I photographed the older pump before dis-assembly so that I could reassemble the new one in similar fashion. I then cut the electrical wires from the old pump, cleaned and stripped the ends of the wires and crimped on fresh spade connectors. I used a digital multi-meter to verify connectivity to the electrical connector on top of the flange.
Once I had everything reassembled, I then reversed the removal process and reinstalled the pump back into the fuel tank.
To the right is the newly assembled VDO pump with the new hoses, electrical wiring, new fuel sender/float ready to be installed. This would also be a good time to install a fresh fuel filter. After seeing firsthand, the amount of debris aggregating at the bottom of the fuel tank, I will be changing the fuel filter often in the future.
First test, and the system is functional. For the first time in seven years, there is positive pressure in the fuel system.
How do I know? Because it started leaking fuel upstream in several places. At least it's a step forward in progress--is it not? Now I have to fix all of these leaks!
I'm still surprised at what deteriorates, dissolves, or breaks down when a car sits in storage for several years.
Comments
I have a '91 corrado G60, the fuel pump is working very badly. It's also a VDO, the reference number is 1H0919051J, what's the reference of the one you bought?
Best Regards,
Hugo
If your chassis is up to L_005732 then you'll have the early pump.
If your chassis is L_005733 or higher, you'll have the later pump.
You'll have to determine which version of pump was originally installed in your vehicle.
If you have a two stage fuel pump, you may have an additional pump located underneath the car near the front axle.
I want to thank you for your article with you because I could not find the pump for Corrado of my friend.
I want to ask you if you tell me the value of the fuel pressure of Corrado G60; My friend has a manual pressure regulator on the rail injectors.
I want you to leave this also my commentary in Italian to help other Italians. Thank you
Caro Les,
ti voglio ringraziare per il tuo articolo perchè con te sono riuscito a trovare la pompa per la Corrado di un mio amico.
Ti voglio chiedere se tu mi sai dire il valore della pressione della benzina della Corrado G60; il mio amico ha un regolatore di pressione manuale sul flauto degli iniettori.
Vorrei che tu lasciassi anche questo mio commento in lingua italia per aiutare altri italiani. Grazie